


Staying on top of your Relay bill helps you avoid financial holds on your account and keeps you on track in your program. This article covers how to view your billing statement and how to pay your bill or let someone pay for you.
Remember, if you have questions about your bill along the way, Relay's financial aid office is here to help you navigate your financial responsibilities.
Table of Contents
-
-
Pay by Check
-
Pay Online by Debit or Credit Card
-
Pay by Phone
-
Viewing Your Billing Statement
-
Log in to your MyApps Microsoft portal.
-
Click the Nelnet tile
-
If it's your first time logging in, you may need to create an account and confirm your information.
-
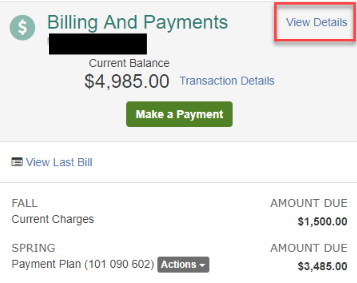
Click Transaction Details to view an itemized statement.
-
Click the print icon if you'd like a printed copy of your statement.
Did you know:
-
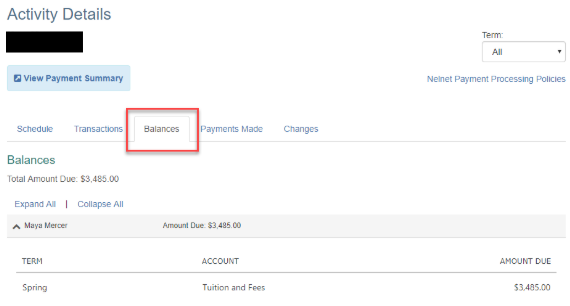
You can filter your Transaction Details view by academic term if you only want to see one term's charges. Here's an example:
Available Payment Methods
You can pay your Relay bill by check, online with a debit or credit card, or by phone if you're on a payment plan.
Pay by Check
-
Make your check payable to Relay Graduate School of Education, and include your student billing ID number — you'll find it on your Nelnet billing statement or your financial aid offer letter.
-
Mail your check to:
RELAY GSE STUDENT FINANCIAL SERVICES
P.O. Box 37095
New York, NY 10087
Keep in Mind
-
Physical checks take time to arrive and process, so mail yours with enough lead time before your due date.
-
If you have more than one balance, we apply your payment to the oldest one first.
Pay Online by Debit or Credit Card
-
Log in to your MyApps Microsoft portal.
-
Click the Nelnet tile.
-
If it's your first time logging in, you may need to create an account and confirm your information.
-
Click Transaction Details to view an itemized statement.
-
Click "Make a Payment."
-
Each term with an active balance will show as its own line. Select the term(s) you want to pay and enter the amount(s).
Keep in Mind
-
Paying with a credit or debit card adds a 2.85% transaction fee.
-
Paying by bank account has no transaction fee.
-
You'll receive an email confirmation once your payment has been processed.
Pay by Phone
If you're enrolled in a payment plan, you and any authorized party can call Nelnet customer service to make a payment over the phone toward your active plan.
Nelnet Customer Service 800-609-8056 Monday–Friday, 7 a.m.–9 p.m. Central Time Saturday, 8 a.m.–2 p.m. Central Time
Keep in Mind
-
If you're the student or plan owner, you can work with the Nelnet representative to direct how your payment is applied once any past-due amounts are satisfied.
-
If you're an authorized party with limited access (not the plan owner), your payment will be applied to past-due balances first, oldest to newest.
How to Let Someone Else Pay Your Bill
If you'd like someone else — a parent, spouse, or anyone you trust — to help manage or pay your bill, you can add them to your account as an Authorized Party. An Authorized Party is a FERPA-compliant third party you've authorized to access your billing information or make payments on your behalf. You can add or remove an authorized party at any time.
Here's how to add one:
-
Log in to your MyApps Microsoft portal.
-
Click the Nelnet tile.
-
Select "Add an Authorized Party."
-
Enter your authorized party's first and last name.
-
Decide whether to give them access to your transaction details. This lets them view the details that make up your balance.
-
Decide whether to give them web access by entering their email address. If you do, they'll receive an email invitation to create their own online account.
-
Review the terms and conditions, which explain what you're authorizing.
-
Click Save.
Once you save, your authorized party will receive an email invitation to create their account. For security, they'll need to answer a security question before they can finish setting it up — if they don't know the answer, they should check with you directly.
If You Withdraw or Are Dismissed
If you withdraw or are dismissed from Relay, your financial responsibilities to us don't end right away. You're still responsible for paying any outstanding balance, and in some cases, for returning a portion of any federal financial aid you received. If you’re considering you should review the withdrawal and refund policies first.
|
|
|
|

